by Katherine DiGiovanni | Mar 30, 2020 | Kitchen Organization, Project of the Day
We’re stepping it up today! Cleaning out your refrigerator might take you a little more time, but it’s probably about time you do it after two weeks of constant use. This is another one of those projects that is very visually satisfying every time you open your fridge. Here are the steps we recommend:
Step 1: Take Everything Out
You know the drill by now: take everything out of the fridge. Check for items that are expired or spoiled and toss those.
Step 2: Clean the Refrigerator
Wipe down the entire inside of the refrigerator with a microfiber cloth or paper towels and an all purpose cleaner. If there are pieces like drawers that can be removed, do that and clean them with warm water and dish soap in the sink.
Step 3: Label
Before you put everything back, make sure you label items that need it. Label leftovers in containers with the name of the item and the date it was made. This will help you know what to use up first when reaching for your next meal. Here are some items we recommend for easy labeling in the refrigerator:
These write on glass or acrylic containers and wipe or wash off beautifully:
The Original Wine Glass Markers – (Set of 5 Wine Markers)

For plastic or Tupperware-type containers, we recommend these:
L LIKED Blank White 1 x 2 Inch Disolvable Labels

We also like to use a Sharpie or marker to write on the outside of a condiment, box of broth, or jar of sauce.
Step 4: Put Items Back and Organize
Put all of your items back. As always, sort like with like.We like to use a few bins in the refrigerator for keeping things sorted by category. Here are a few items we like:
Sorbus Fridge Bins Stackable Containers

Produce Saver Refrigerator Organizer Bins

mDesign Plastic Free-Standing Water Bottle and Wine Organizer

For jars and bottles that are too numerous to fit into the compartments in the door of the refrigerator, we like to use a lazy susan to ensure that those items don’t get lost. Here is a nice one that is easy to keep clean:
OXO Good Grips Lazy Susan Turntable, 16-Inch, White

And now you’re done! You’ll be so happy you did this – every time you open your fridge, you’ll marvel at the great work you’ve done! As always, please snap a pic and tag us on social media or send to us!
by Katherine DiGiovanni | Mar 27, 2020 | Project of the Day
I know, you’re thinking “This isn’t an organizing task!” But hear me out!
At least some of the people reading this have sending a few thank you notes on their to do list. Just sit down for 10 minutes and get them done.
If you don’t have any thank you notes to send, just write a few hand written notes to people. It will make you feel good and accomplished. And the recipient will be thrilled to receive it! It feels good to get offline and connect with people in a way that humans have been connecting for a very long time.
Nicole’s children have been writing hand written notes and cards to their friends and have really enjoyed it. Consider getting your kids involved!
I like to use a favorite pen and some nice stationery for my notes. I also like to get cool stamps at the post office whenever I visit to affix to my envelopes.
If you’re unsure of how to start a thank you note, here is a great guide or formula from the Spruce that will work very well.
We feel especially good about this because by mailing your notes or cards, you’ll be helping the men and women of the U.S. Postal Service who are out there every day making at least that part of the world function.
So thank you to Neatnik’s readers and followers. Have a great weekend and we’ll be back on Monday with some new projects!
by Katherine DiGiovanni | Mar 27, 2020 | Bathroom Organization, Cosmetic Organization, Project of the Day
by Katherine DiGiovanni | Mar 26, 2020 | Bathroom Organization, Cosmetic Organization, Project of the Day
If your make-up collection is anything like mine, it includes the following types of items. Makeup you:
- Like and use all the time
- Thought you’d like at the store, but don’t
- Wore when you were younger
- Bought for a special night out that you don’t wear when special night out comes around
- Got for free
- Bought online that is not good
That about sums up my make up collection! I’m a bit of a reformed junkie – my collection is pretty under control, but I have purchased A LOT of make-up in my day. So I speak from experience when I provide to you the following steps to declutter your make-up:
Step 1: Take Everything Out
You know the drill by now! Take everything out of where you store it. Every last 1997 Revlon lipstick!
Step 2: Sort and Discard
Start by sorting everything by category – lipsticks, eyeliners, powders, etc.
Then go through each item. If an item meets the following criteria, then discard it:
- You don’t wear it and would not wear it.
- It is old.
Believe it or not, make-up has expiration dates. It’s painful to hear since many of us have spent loads of money on this stuff. Each piece should have a little symbol on it with a number in the middle. This indicates the number of months it is good for. It looks like this:
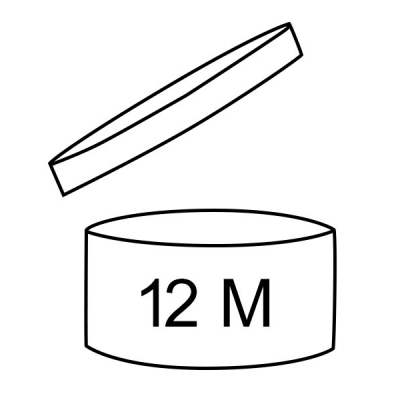
But if you can’t find that, here are some basic make-up expiration guidelines:
- Eyeliner: 6 months to 1 year
- Lipstick: 2 years
- Mascara: 3-6 months
- Blush, eye shadow, and other powder cosmetics: 1-2 years
- Foundation: 6 months to 2 years
It’s like ripping a band-aid; just do it and get it over with!
Step 3: Clean
Wipe down the drawers or cabinets where you store your make-up and all of the containers. If your containers are really gross, take them to the kitchen and wash them with hot water and a bit of dishwashing liquid.
Step 4: Organize
Put your culled down collection back in a way that makes sense for you. Sort like with like – lipsticks together, foundation together, etc. If you’d like to get some new make-up organizers, here are a few that we like:
STORi Premium Quality Clear Plastic Makeup Palette and Brush Holder

hblife Clear Makeup Brush Holder Organizer

STORi Clear Plastic Makeup & Vanity Drawer Organizers | 10 Piece Set

mDesign Wide Makeup Organizer

Bonus Step: Wash Your Brushes
Don’t think about the last time you did this – you don’t need that kind of negativity in your life right now. Just get a bar of soap or some old shampoo and wash and rinse them all. You’ll feel so accomplished!
And now you’re done! Good for you. Try putting on a little bit of make-up everyday to make yourself feel a little more human. And maybe try out those lipsticks that you kept but weren’t sure about? Take a picture of your organized set-up and send it to us!
by Katherine DiGiovanni | Mar 25, 2020 | Paper Organization, Project of the Day
I’m confident that if you set your mind to it, this should not be a difficult task to complete in a short amount of time. Start by walking around your house and collecting all of the old newspapers, magazines, and catalogs .If you still need to read some of them, make a stack and start reading! If you were me, you would just dump them all into your recycling bin – I keep almost none of this stuff.
But you’re not me, so here are some ideas of how to sort these items:
Newspapers
Recycle them! If you have an article that you somehow cannot find online and you want to keep it, cut it out and discard the rest. Put your clipping in a file by topic or writer or however you want to categorize it.
Magazine Articles
Same as above. If somehow there is an article you want to keep, cut it out and file it like above.
Recipes
Magazines have so many great recipes. (Some of my favorites are from Martha Stewart Living and Epicurious.) If you can’t find the recipe online, clip out the recipe and put it in a file or a binder with your recipes. (We’ll talk about organizing recipes at a later date.)
Catalogs and Decor Magazines
A lot of our clients are very interested in home decor and get a lot of inspiration from catalogs and magazines. They put together such beautiful spreads. Again, clip out the “look” that you want to save and file it. When it comes to decor, you should probably file by room or type of decor. If you’re anything like a lot of us, these decor clippings can be voluminous so you’ll want to organize them so you can find what you need at a later date.
And that’s it! Be careful when hauling around the magazines; they can be really heavy. One should never become injured when organizing! Snap a pic of your stacks of recycling and share with us!
by Katherine DiGiovanni | Mar 24, 2020 | Digital Organization, Project of the Day
If you’re anything like me, this is a long overdue task. My email inbox(es) has gotten totally out of control. With these recent weeks of so many emails – I have received at least one email on Covid-10 from every company I have ever done business with – and it’s been hard to keep up.
For me, the more cluttered my inbox gets, the less I want to look at it, and the less likely I am to look at the emails that actually need my attention. It’s a vicious cycle that can be halted by less than an hour’s worth of culling, filing, and deleting.
Everyone uses different email platforms with different capabilities, so this guide is fairly high level. You can figure out what works best for your inbox, but here are the steps that I take. I adapted this explanation from this awesome guide from Fast Company to clean up your inbox in one hour or less:
Step 1: Clear Out the Junk
Set a timer for 10 minutes and just start mass deleting messages you know are junk, like messages from social media accounts, delivery confirmations, and anything that is no longer relevant.
In gmail, you can search your inbox for common senders or subject lines (for example: Amazon delivery) and deleting those messages in batches.
Step 2: Create Folders and Labels
Set your timer for 20 minutes and organize the messages left that don’t need action, but that you need or want to keep.
Start creating folders by topic or type of email that have several messages that relate to it. So, that could mean folders like: Receipts, Projects, Travel, etc. You can always add and adapt folders as you go and figure out what works best for you.
Use this 20 minutes to make the quick, easy decisions. Don’t spend a lot of time on any one message. If you’re unsure about an email, create a folder called “Misc” or “To File” and put it in there. Some time in the future when you have a few minutes, you can look at that folder again and think about where to file those messages.
I err on the side of keeping when it comes to client emails (i have an email folder for each client) and just park much of the correspondence in there. It’s probably not necessary, but it helps me sleep at night knowing that I haven’t deleted a possibly important email. I use gmail so I have basically unlimited storage for messages.
Step 3: Make a To-Do List for Emails That Need Action
Set a timer for 30 minutes. After steps one and two, the emails you’re left with now should only be ones that need action. If the action can be completed in less than two minutes, do it now. If you need more time to take care of the message, add it to your to-do list with a notification to remind you to actually do it. Then, file the email to keep your inbox clear (you’ll still be able to search for it later).
If you’re just not a list maker, you can instead use Gmail’s snooze feature to have the email show up in your inbox when you’re ready to handle it. Or, if you’re an Outlook user, the follow-up feature lets you do the same.
And that’s it! You’ve got an organized inbox and you’re ready to take on the rest of your lockdown/quarantine/social distancing time in a state of digital order. Keep it up – take a little time each day to file and delete so that you don’t end up here again.